How to install WindowsXP using USB Flash Drive(Pen Drive)
Why would anyone want to install Windows XP from a pen drive?
1. Some Laptops like asus eeepc, acer aspire one, hp mini etc don’t have CD-drive
2. May be their CD drive isn’t working properly like mine, or
3. They don’t want to waste money on a CD
More over installation from a flash drive is faster compared to a CD.
Before we go on with the tutorial here’s what you’ll need
Requirements
——————
1. USB flash drive, 1GB or larger
2. 1 Windows XP installation disc
3. Assorted files that I’ll describe as we go along.
Note: Your BIOS should support usb boot, some older computers may not support USB boot.
First up, we need to prepare the flash drive.
1. Download and unzip this file, which should contain 2 folders: 1 titled Bootsect, and the other USB_prep8.
or you can download from these locations
http://www.techrena.net/downloads/usb_boot_prep_xp.zip
password :techrena.net
http://geniushackers.com/blog/wp-content/uploads/2009/06/flash-drive-prep.zip
2. Navigate to the USB_prep8 folder and click on usb_prep8.cmd. This will bring up a Windows console window.
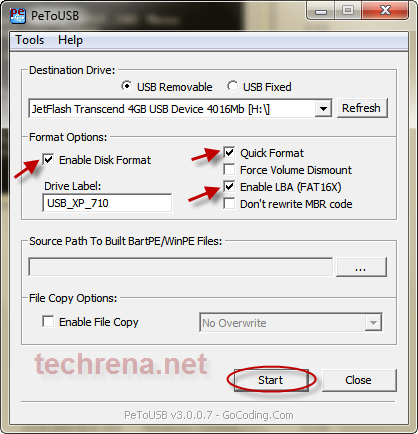
3. Press any key to continue and a PeToUSB window will open.
4. Make sure your flash drive is selected, and click start to format your flash drive.
5. When the format is complete, click OK, but do not close the PeToUSB window or the Windows Console.

6 Open a new console window by typing “cmd” into the run box in the Windows Start Menu.
7 Directed to the second folder – Bootsect folder (if you’re not used to DOS commands, you can type “dir” to list directories and files, type “cd foldername” to navigate to a folder name – called foldername in this example, and if there’s a long folder name you can save time by typing the “cd” and just the first few letters and then hitting the Tab key to fill in the rest of the name).
8 Once you’re in the Bootsect folder, type “bootsect.exe /nt52 g:” if “g” is the letter assigned to your flash drive. If it’s E, then change the letter to e. If it’s Z, make it z. Get it?
9 When this is done, you should see a message letting you know that the bootcode was updated, and you can close this console window (but not the other console window).
10 Close the PeToUSb Window, but make sure not to close the remaining console window yet
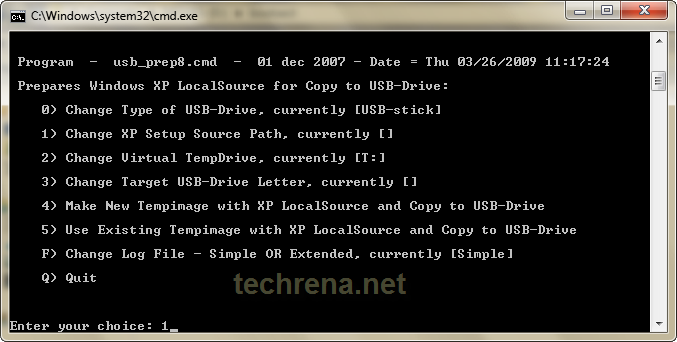
11 You should now see a list of 8 options in the console.

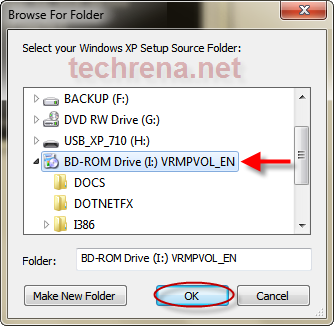
12 Select one and find the drive with your Windows installation disc.

13 Select 2 and pick a random drive letter (but not one that’s already on your PC, since this will be a virtual drive used for copying your files).
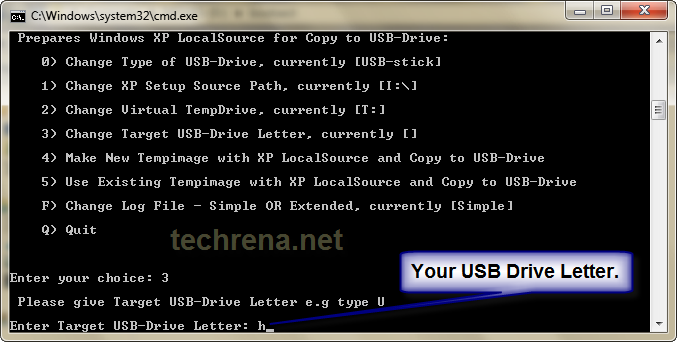
14Select 3 and enter the drive letter for your USB flash drive.

15 Select 4 and follow the rest of the on-screen directions and you should be all set.

The process should take about 15-20 minutes. When it’s done, you should have a bootable USB stick that you can use to install Windows XP the same way you would if you had a CD/DVD drive.
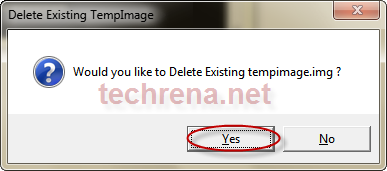
16 It will ask you to format the T drive. Enter y and it will format your temp drive. Press any key to continue. Now it will start copying the XP files to the tempdrive.
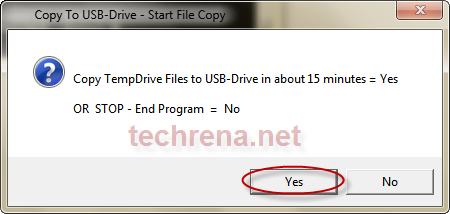
17 After the completion of the file copy process Press any key to continue. Now it will ask you to copy the files to your USB drive or not. Select Yes.

18 During the copy process it will ask whether to change migrate.inf file or not. Is you are using a USB stick then Select Yes. If you are using a USB hard drive then Select No.

19
After the successful completion of the process close the cmd console. Now your pen drive is ready for the installation process.
20 Plug in the USB drive to the computer you want to install XP. While start up make sure that you set the first boot choice as your USB drive. To do this you have to enter to the bios and change the boot order to USB Disk as the first choice. For entering to BIOS press the BIOS setup key while start up. This key is usually seen in the screen in the boot screen. For most of the systems it is DEL key. For HP and Compaq it is F10 etc. Go to the boot configuration tab and change the boot order.
21 While booting up from the USB it will ask you to choose between GUI and TXT mode of setup. Select TXT mode for now.

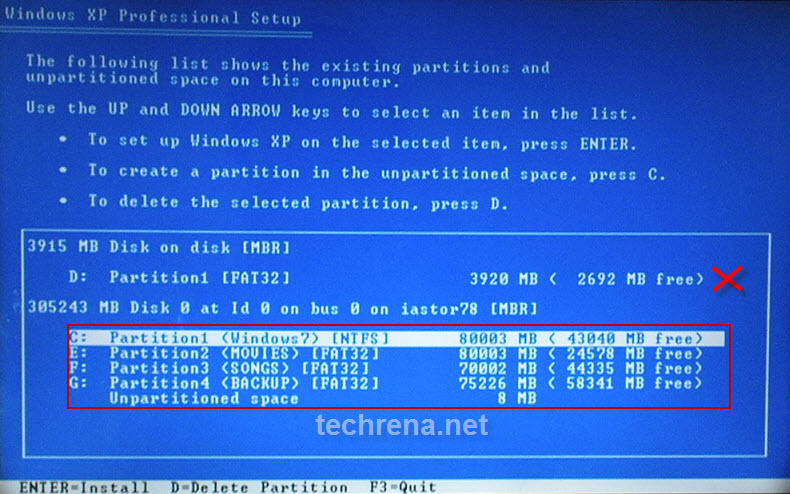
22 Follow the onscreen instructions. It is same as the usual setup process. In the partition selection screen do not select you USB drive for install. And if you are installing in a new RAW hard disk then your USB Drive will be the C drive. Now first create a new partition and format your HDD using the setup. And again restart the process from step 15 by Quitting the current Install(Press F3). Then you should get your HDD partition as C drive. Continue your installation.

Source: http://www.techrena.net
1. Some Laptops like asus eeepc, acer aspire one, hp mini etc don’t have CD-drive
2. May be their CD drive isn’t working properly like mine, or
3. They don’t want to waste money on a CD
More over installation from a flash drive is faster compared to a CD.
Before we go on with the tutorial here’s what you’ll need
Requirements
——————
1. USB flash drive, 1GB or larger
2. 1 Windows XP installation disc
3. Assorted files that I’ll describe as we go along.
Note: Your BIOS should support usb boot, some older computers may not support USB boot.
First up, we need to prepare the flash drive.
1. Download and unzip this file, which should contain 2 folders: 1 titled Bootsect, and the other USB_prep8.
or you can download from these locations
http://www.techrena.net/downloads/usb_boot_prep_xp.zip
password :techrena.net
http://geniushackers.com/blog/wp-content/uploads/2009/06/flash-drive-prep.zip
2. Navigate to the USB_prep8 folder and click on usb_prep8.cmd. This will bring up a Windows console window.
3. Press any key to continue and a PeToUSB window will open.
4. Make sure your flash drive is selected, and click start to format your flash drive.
5. When the format is complete, click OK, but do not close the PeToUSB window or the Windows Console.
6 Open a new console window by typing “cmd” into the run box in the Windows Start Menu.
7 Directed to the second folder – Bootsect folder (if you’re not used to DOS commands, you can type “dir” to list directories and files, type “cd foldername” to navigate to a folder name – called foldername in this example, and if there’s a long folder name you can save time by typing the “cd” and just the first few letters and then hitting the Tab key to fill in the rest of the name).
8 Once you’re in the Bootsect folder, type “bootsect.exe /nt52 g:” if “g” is the letter assigned to your flash drive. If it’s E, then change the letter to e. If it’s Z, make it z. Get it?
9 When this is done, you should see a message letting you know that the bootcode was updated, and you can close this console window (but not the other console window).
10 Close the PeToUSb Window, but make sure not to close the remaining console window yet
11 You should now see a list of 8 options in the console.
12 Select one and find the drive with your Windows installation disc.
13 Select 2 and pick a random drive letter (but not one that’s already on your PC, since this will be a virtual drive used for copying your files).
14Select 3 and enter the drive letter for your USB flash drive.
15 Select 4 and follow the rest of the on-screen directions and you should be all set.
The process should take about 15-20 minutes. When it’s done, you should have a bootable USB stick that you can use to install Windows XP the same way you would if you had a CD/DVD drive.
16 It will ask you to format the T drive. Enter y and it will format your temp drive. Press any key to continue. Now it will start copying the XP files to the tempdrive.
17 After the completion of the file copy process Press any key to continue. Now it will ask you to copy the files to your USB drive or not. Select Yes.
18 During the copy process it will ask whether to change migrate.inf file or not. Is you are using a USB stick then Select Yes. If you are using a USB hard drive then Select No.

19
After the successful completion of the process close the cmd console. Now your pen drive is ready for the installation process.
20 Plug in the USB drive to the computer you want to install XP. While start up make sure that you set the first boot choice as your USB drive. To do this you have to enter to the bios and change the boot order to USB Disk as the first choice. For entering to BIOS press the BIOS setup key while start up. This key is usually seen in the screen in the boot screen. For most of the systems it is DEL key. For HP and Compaq it is F10 etc. Go to the boot configuration tab and change the boot order.
21 While booting up from the USB it will ask you to choose between GUI and TXT mode of setup. Select TXT mode for now.

22 Follow the onscreen instructions. It is same as the usual setup process. In the partition selection screen do not select you USB drive for install. And if you are installing in a new RAW hard disk then your USB Drive will be the C drive. Now first create a new partition and format your HDD using the setup. And again restart the process from step 15 by Quitting the current Install(Press F3). Then you should get your HDD partition as C drive. Continue your installation.
Source: http://www.techrena.net


0 comments :
Post a Comment